
For my first DIY Smart Home project which I completed last year I kept it as simple and reliable as possible by keeping all of the connections wired, apart from the connection from my phone to the wireless network to control the light. The objective was to control a porch light using a Raspberry Pi, by using a GPIO pin to control a relay and a Web API to accept control commands. To provide communication to the outside world, I decided to use a Node-RED instance running on a linux (Fedora) VM on my home network. The Node-RED instance is itself running on Docker on top of the VM to provide ultimate portability of the installation and configuration.
The circuit
The Raspberry Pi GPIO runs on 3.3v and has limited current source/sink capability, powering a traditional relay directly is very unwise as not only will it overload the pin, the back-EMF generated by the relay coil will likely damage the Pi. To save some time in making a simple drive/protection circuit and make for a neat installation I decided to buy one of these, Automation Hat as I also plan on using the same Pi to control other items and so will require additional protected IO. The Automation Hat uses one of it's buffered outputs to switch a relay connected to a 12V lighting PSU to power the outside light. In the end I decided to save the Automation Hat outputs for other purposes and used an opto-isolated relay module with a buffered input which can be connected directly to a GPIO pin.
The Raspberry Pi
The Pi I used is the latest (at the time of writing) version 3 Model B with 1GB of RAM running Raspbian Jessie lite. For hardware such as the Pi its always best to go with the flow as to what OS to run, Raspbian has the best support for the hardware compared to other distributions. I fitted the Pi in a convenient location wired to the network and hidden away but close enough to allow easy enough wiring to things I wanted to control.
The Web API
I did a fair bit of research last year before deciding how to approach writing a simple API, my initial preference was to use .NET Core as ARM32 builds had recently been added, but support for GPIO in .NET wasn't mature, there were a few packages on Nuget but nothing that filled me with confidence so I decided to revisit at a later date and use an established solution instead. Python is the language of choice for Pi projects, although I am not a fan of the syntax, support for GPIO is first class and it is possible to create a web API using Flask. The code can be found here in my GitHub repository: https://github.com/chrisckc/AutomationHatWebApi I decided not to add authentication to the Python web API at this stage, the Raspberry Pi is only exposed to the internal home network and is connected to a separately protected subnet via a VLAN capable switch.
Node-RED
The Node-RED instance was configured to run on Docker inside a Fedora Linux VM to act as the logic and control gateway for communication with cloud services such as IFTTT, similar to the function of the Samsung SmartThings Hub. Any exposed HTTP web API endpoints are protected with SSL and basic auth behind an NGINX reverse proxy. To protect the endpoints against DOS attacks, brute force attempts and vulnerability scanners, Fail2ban is used to blacklist IP's at the firewall level.
To create a web based dashboard to control the state of the light I used Node-RED Dashboard https://github.com/node-red/node-red-dashboard again protected with SSL and basic auth.
IFTTT & Google Assistant
The ultimate goal of this little project was to control the light with voice commands, the easiest way of achieving this using the Google Assistant API is to use the IFTTT service. There are many existing "Applets" available that carry out various tasks with other services, to control your DIY project you need to create your own Applet.
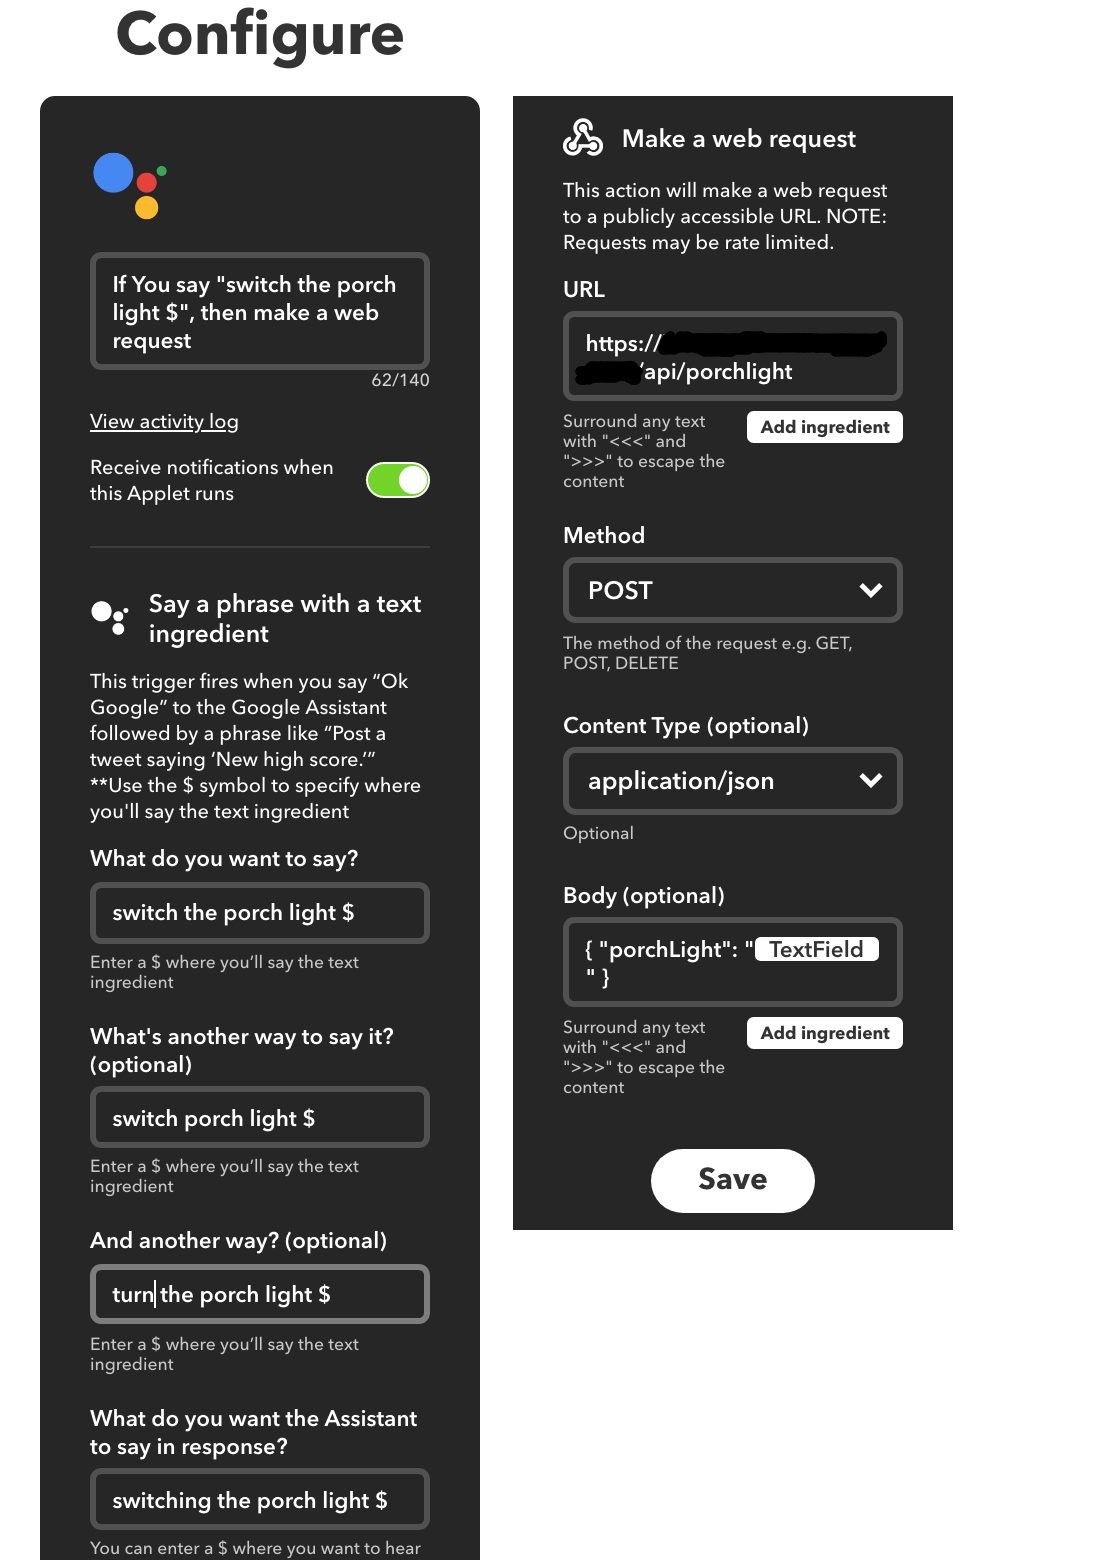
Create a new "Applet", for the "This" command, search for Google Assistant, this will require connecting to the Google account that your are using with the assistant on your phone or Google Home device. You then enter the text string(s) you want the assistant to look out for. You can use the $ sign as a "text ingredient" variable to pass on to the "That" command, such as the words "on" or "off".
For the "That" command, search for "Webhook" and choose "Make a Web Request", enter the public URL and Method of the API endpoint that you created using Node-RED. I created the Node-RED endpoint to accept the HTTP POST method with a JSON body which describes the action to take. The logic in the Node-RED flow determines what do when this endpoint is called, for this example it calls the correct endpoint on the Python Web API method on the Pi to control the light.
I used the following format for the web request URL to specify the credentials:
https://username:password@host.domain.com/api/porchlightYou can pass on the text ingredient in the body as JSON like this:
{ "porchLight": "{{TextField}}" }Here is a screenshot of the Applet Configuration:
IFTTT & Geofencing
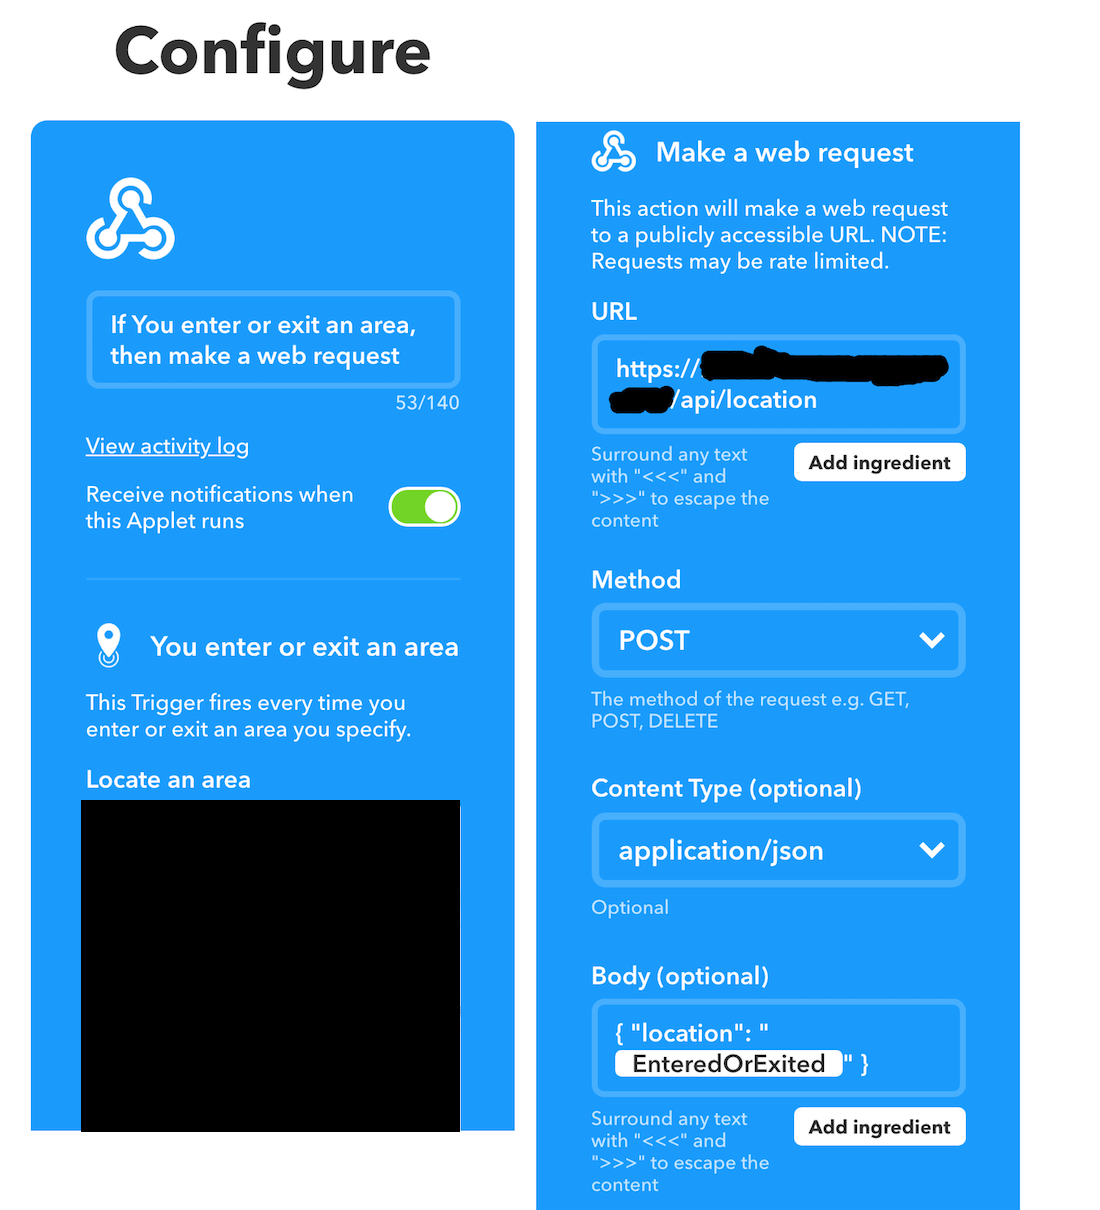
To setup the geofence, create a new "Applet", for the "This" command, search for "Location" and choose "You enter or exit an area". Define the area on the map, don't use the highest zoom level as it seems like the centre point co-ordinates are not stored with enough accuracy. For the "That" command, search for "Webhook" and choose "Make a web request".
I created an endpoint on the Node-RED instance at /api/location as a generic endpoint for multiple location notifications but currently only using a single location. The logic in the Node-RED flow determines what do when the endpoint is called, this could involve making calls to several IoT devices on the home network to set the scene for arriving home etc. Currently it just calls the correct endpoint on the Python Web API running on the Pi to control a single light.
You can pass on an ingredient in the body as JSON like this:
{ "location": "{{EnteredOrExited}}" }Either the string "entered" or "exited" will be substituted when the geofence is triggered.
Here is a screenshot of the Applet Configuration:
Alternative approach
A better approach maybe to use MQTT to avoid having to expose an API to the internet, the only issue is that IFTTT does not currently support MQTT directly. The only way is to use a service which provides a HTTP to MQTT bridge (or create your own) and use the existing "Webhook" feature in IFTTT, which would defeat the object of using MQTT.
To use MQTT directly with Google Assistant would require you to write your own code against the Google Assistant API, which I may end up doing at some point.
Security
I have seen some disturbing IoT configuration examples on the web which send an API username and password in query parameters, or use basic authentication without SSL protection.
When testing my implementation I was surprised to find that the Webhook feature on the IFTTT service did not provide any obvious way of providing a secure method of authentication to the endpoint defined in the URL field. After some searching I found that it was possible to use the basic auth "username:password@domain" format in the URL field, which when combined with SSL provides a good enough level of security for this particular use case. The base64 encoded username and password is sent inside the payload which is protected in transit between the IFTTT service and my exposed endpoint.
The only issue is that the URL will need to be stored in a database somewhere behind the IFTTT service with either no encryption or some kind of reversible encryption as it needs to be used to make requests. In the event of a breach in the IFTTT service, it could potentially be leaked, which in combination with the format of the JSON payload would allow someone else to craft requests which can successfully control my lights... To provide further security I could of course lockdown the allowed source IP's to the ones used by IFTTT, but this always ends up breaking things when IP's change or new ones are used.
Conclusion
I now have a the ability to turn my porch light on and off by either using the web browser on my phone against the Node-RED dashboard to toggle a switch, or by saying "say OK Google, switch the porch light on|off" to which the assistant responds with "Switching the porch light on|off" followed almost immediately by the state of the light changing. The geofence location detection seems to be a bit unreliable, it relies on the IFTTT app being installed on my phone and running in the background to receive location updates from the Android OS.
This has been a worthwhile learning experience to gain an understanding on how to improve the design for any future efforts.